hands-customer-scanning-qr-code-coffeeshop-counter-downloadu-smartphone-min

How to Create Your Own vCard QR Code with QR Stuff

In the digital age, sharing contact information efficiently is essential for personal and professional networking. One innovative and hassle-free way to do this is by using QR codes. QR (Quick Response) codes are those square patterns of black squares on a white background that you can scan with your smartphone’s camera. When scanned, these codes can instantly retrieve information. One common use of QR codes is to create a vCard QR code, which allows you to share your contact information effortlessly. In this blog post, we’ll guide you through the simple process of creating your own vCard QR code using QR Stuff, a free and user-friendly online QR code generator.

Why Use a vCard QR Code?

Before we delve into the creation process, let’s briefly discuss the benefits of using a vCard QR code. A vCard is an electronic business card that contains all your contact details, including your name, phone number, email address, physical address, website URL, and more. Instead of manually entering this information into a phone or email program, a vCard QR code streamlines the process. When someone scans your QR code, their device will instantly add your contact information to their contacts list. It’s efficient, eco-friendly, and it eliminates the risk of typos or errors when manually entering data.

Step-by-Step Guide to Creating a vCard QR Code with QR Stuff

Step 1: Visit QR Stuff Begin by opening your web browser and navigating to the QR Stuff website. You can do this by going to https://www.qrstuff.com. Register your free account.

Step 2: Select vCard as the Data Type On the QR Stuff homepage, you’ll find a range of data types to choose from. Select Contact Details and then select “vcard” as the data type for your QR code.

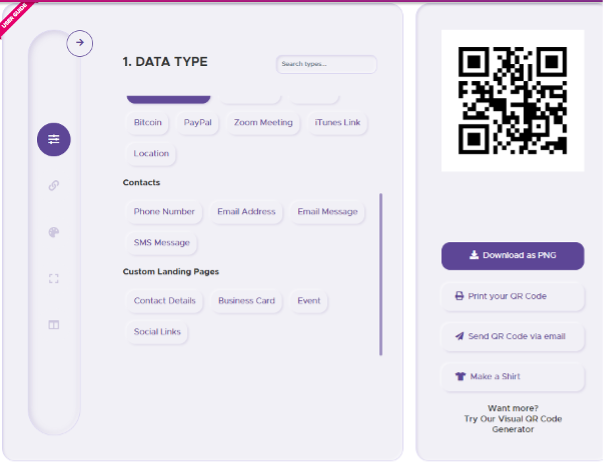
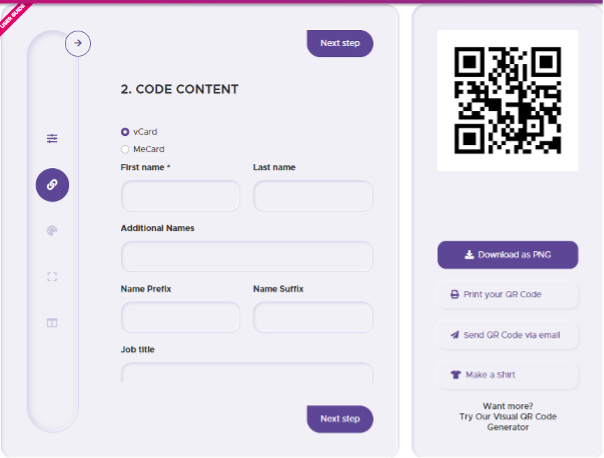
Step 3: Fill in Your Contact Information Now, it’s time to enter your contact information. But first please select “vcard” and then fill in the details. The fields may include your full name, job title, organization, email address, phone number, physical address, and website URL. Make sure all the details are accurate and up to date.

Step 4: Customize Your QR Code (Optional) QR Stuff allows you to customize your QR code’s appearance. You can change the color of the QR code, add a logo or image in the center, and choose a specific pixel size. These customization options give your QR code a unique and personal touch.

Step 5: Generate Your QR Code After entering your contact information and customizing your QR code (if desired), the website will auto-generate the QR Code. You can see the you vcard QR code on the right side.

Step 6: Download Your QR Code Once your QR code is generated, you’ll see a preview of it on the screen. To download it, click the “Download as PNG” button. The QR code image will be saved to your device.

Step 7: Test Your QR Code Before sharing your vCard QR code, scan it with your smartphone’s camera or a QR code scanning app to ensure it correctly imports your contact information into your device’s contacts.


Conclusion

In just a few simple steps, you can create your own vCard QR code using QR Stuff, making it easier than ever to share your contact information with friends, colleagues, or potential business partners. QR codes are versatile and efficient tools that bridge the gap between the physical and digital worlds, simplifying the way we connect and share vital information. Try it out for yourself and discover how convenient and powerful QR codes can be for enhancing your networking efforts in the digital age. Happy networking!

11000-min

Google Search Tips & Tricks for Optimal Results

In the realm of online searches, there are instances where we might forget or get confused about finding the information we need. To assist you in achieving the best results, Google offers suggestions and ways to refine your search. Set Google as your primary Search Engine and utilize these tips & tricks to enhance your search skills:

1. “This” or “That”: If you’re unsure about the exact definition or wording, use “or” between words to refine your search. Google will provide the best results to address your confusion.

2. Multiple Results with “~”: Use the “~” symbol between words to get results that include synonyms. This helps in searching for information related to specific words and their synonyms.

3. Search Within Websites: To find something you saw on a website but forgot, use Google. Type the URL of the website followed by keywords for results related to that website.

4. Wise Use of Asterisk: Place an asterisk “*” in the place of words or numbers you can’t recall, and Google will search for matching results.

5. When Many Words are Missing: Add the word “Around” and the quantity of missing words between the desired words. This helps in finding information not fully remembered.

6. Searching Within a Time Frame: Use three dots “…” between “from” and “to” for the desired time frame. Google will display information within that time frame.

7. Know “intitle” and “inurl”: Use “intitle:” to search for keywords in the title of articles and “inurl:” to search for keywords in the URL of websites.

8. Searching Related Websites: Type “related:” before a website’s address to search for websites related to that specific site.

9. Search for Specific Phrases: Use a single or double inverted comma before and after the search query to get exact results.

10. Exclude Unnecessary Words: Use the minus “-” symbol before words you want to exclude from your search.

By mastering these tips & tricks, you’ll become a pro at using Google to search for information more efficiently. Make Google your trusted ally in searching, and explore the online world with your newfound knowledge.

browser-computer-ready-read-website-that-start-with-www-min

Optimizing Your Web Experience: A Guide to Efficiently Clearing Your Browser Cache

Do you realize that every time you browse the internet, there are numerous processes happening behind that activity? One of them is that the browser you use will collect data about preferences and various elements from a website. All this data will be stored in the cache to enhance the internet browsing experience, making it faster and smoother. However, it’s worth noting that cache can sometimes pose some issues.

Websites determine which parts will be stored in the cache and for how long they will be retained. Some elements may be cleared after a few days, while others may persist for up to a year. But what exactly is cache? We will delve further into understanding this. Let’s continue reading right away!

Question: Why is there a constant recommendation to clear the cache when logging out of internet banking websites? It seems a bit perplexing. What exactly is this cache, and why is it necessary to clear it?

Answer: The cache functions as a temporary storage space within the computer, preserving data utilized during web interactions. For users of browsers such as Internet Explorer or Mozilla Firefox, all information from visited websites is temporarily stored in the cache. This encompasses login details and passwords, notably when accessing internet banking or social media.

Benefits and Awareness: The imperative of clearing the cache lies in the potential risk: if someone gains access to our computer, they could retrieve comprehensive information and data stored within the cache.

Question: But what if it’s our personal computer?

Answer: While it is acceptable for personal computers, lending our computer to someone else or using a shared computer in environments like university labs introduces elevated risks. In such instances, if unauthorized access occurs, valuable information can be extracted from the cache.

Benefits and Awareness: To mitigate these risks, it is prudent to clear cache data post-use, especially after conducting financial transactions or entering personal information. Moreover, cache clearance is a straightforward process.


How to Clear the Cache

Google Chrome:

  • Click on the three dots in the upper right corner.
  • Choose ‘Settings.’
  • Under ‘Privacy & Security,’ opt for ‘Clear Browsing Data.’
  • Select either ‘Basic’ or ‘Advanced.’
  • Choose the time range and execute ‘Clear Data.’

Mozilla Firefox:

  • Access ‘Tools.’
  • Choose ‘Options.’
  • Navigate to ‘Advanced’ and select ‘Network.’
  • Within ‘Offline Storage,’ execute ‘Clear Now.’
  • Confirm with ‘OK.’
  • Alternatively:
    • Access ‘Tools.’
    • Choose ‘Options,’ then ‘Privacy.’
    • In ‘History,’ configure to ‘Use custom settings for history.’
    • Activate ‘Clear history when Firefox closes’ and select ‘Cache.’
    • Confirm with ‘OK.’

Internet Explorer:

  • Click on ‘Tools.’
  • Select ‘Internet Options.’
  • Navigate to ‘General.’
  • Under ‘Browsing History,’ opt for ‘Delete.’
  • Choose ‘Temporary Internet Files’ and execute ‘Delete.’
  • Confirm with ‘OK.’

Benefits and Awareness

Clearing the cache not only mitigates risks but can also enhance browser speed. While the steps may vary across browsers, this concise guide is tailored for Internet Explorer, Mozilla Firefox, and Google Chrome. Vigilance in this regard ensures a secure computing experience free from unwarranted disruptions.